旧版 ISO 安装器指南
仅适用于旧版 ISO
本指南仅适用于旧版 ISO。由于新安装器暂不支持手动分区,并且仍存在一些小问题,旧版 ISO 目前仍然受支持。
系统要求
- 如需确认 AeroCore OS 的硬件要求,请阅读 游戏硬件兼容性指南。
- 大多数硬件支持安全启动和可信平台模块(TPM),但你必须在安装期间或安装后登记我们的密钥。
- 也支持与 Windows 双系统启动。
安装器要求
- 下载 AeroCore OS ISO 的方式。
- 如果直接下载失败或速度太慢,可以使用 Motrix 之类的下载管理器。
- 一个
16GB以上的可启动介质,例如 U 盘。 - 使用 Fedora Media Writer(Windows/macOS 或 Linux)之类的软件写入 ISO。
- Ventoy 不是受支持的旧版 ISO 写入工具。
- 推荐准备实体有线键盘;没有触摸屏的设备必须使用实体键盘。
- 如果有键盘,请创建包含用户名和用户密码的用户账户。
桌面环境
所有镜像都可以选择 KDE Plasma 或 GNOME 作为桌面环境。
Steam 游戏模式可以作为 KDE Plasma 或 GNOME 之外的额外会话使用,推荐用于家庭影院 PC(HTPC)和掌机场景。
不同镜像变体之间的差异可以参考 FAQ。
Steam 游戏模式(-deck 镜像)

Note
设备启动后会自动进入 Steam 游戏模式会话;可从 Steam 游戏模式的“电源菜单”进入桌面模式。
{% block desktop_envs_steam_notes %}
- 需要 Steam 账户
- 包含在 AeroCore OS Deck/掌机场景镜像中
- 界面面向掌机和客厅游戏场景设计
- 对手柄友好
- 桌面模式会话可选择 KDE Plasma 或 GNOME
- 可通过 Decky 插件扩展功能(查看全部插件)
{% endblock %}
0. 备份数据
继续安装前,请务必把计划安装 AeroCore OS 的磁盘上的个人数据备份到安全位置。
1. Download and Flash Legacy ISO
- Download Bazzite after choosing the correct ISO for your hardware with our Image Picker tool.
- Flash Bazzite to your bootable medium.
- Eject the drive after flashing the ISO.
Calculating ISO SHA256 Checksum Hash
Video Tutorial:
https://www.youtube.com/watch?v=wUDbMJtR1sM
2. Boot Bazzite
- Connect your bootable medium to your device and boot into it.
- After connecting the device, boot into the Bazzite installer.
- This depends on your motherboard hardware, but most of the time it could be a function key like F9 or similar.
- Sometimes you need to consult the manual, look up your device online, or read any hotkeys that appear when you boot your PC.
- Alternatively change the BIOS settings to boot with your bootable device first before your current storage, but this is not recommended to keep enabled after installing Bazzite.
- Verify the media correctly and proceed to the installer.
Handheld Devices
Hold the 'Volume Down' (-) button and click the Power Button, and when you hear the chime, let go of both buttons, and you'll be booted into the Boot Manager. When you get to the boot menu, select your bootable device to boot into the Bazzite installer.
3. Inside the Installation Medium
Installing Bazzite without a physical keyboard connected to your device:
If you do not have a USB physical keyboard connected, do NOT press "User Creation", since it will remove the default username and password, and you will be unable to type a username or password without a physical keyboard.
default user: bazzite
default password: bazzite
- Select your language, region, keyboard layout, and time zone.
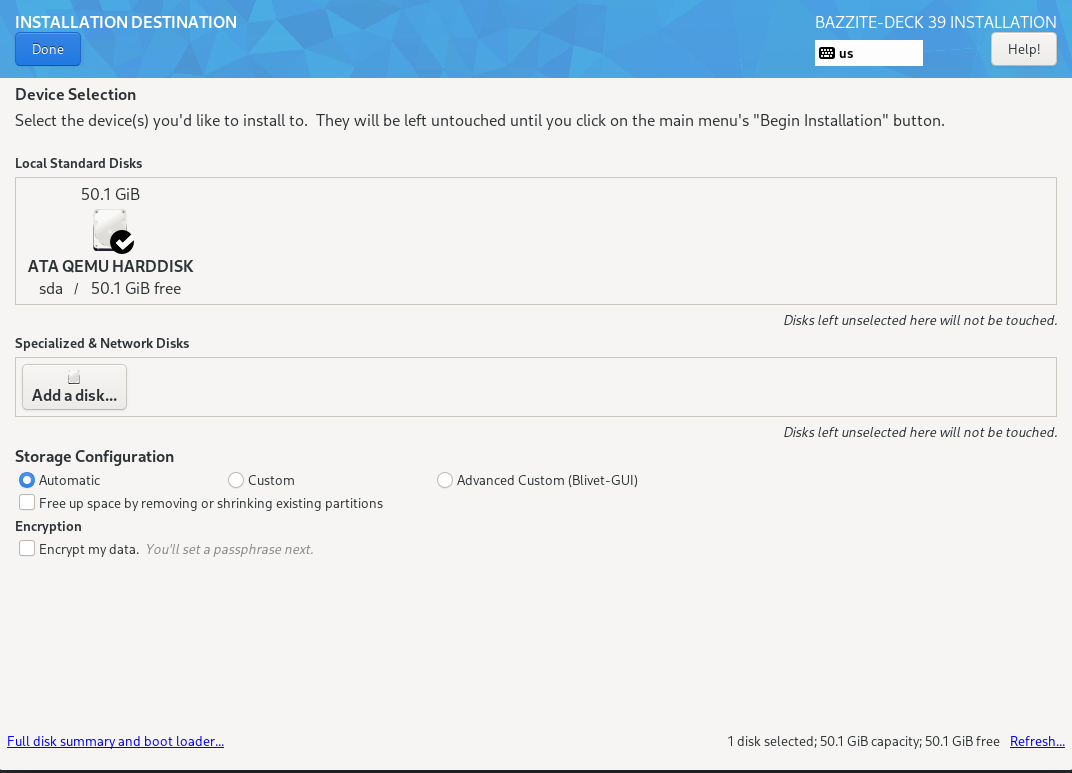
- Select the drive that Bazzite is going to be installed on.
- Delete any partitions that you have remaining on the drive unless dual booting on the same drive.
- Recommended to use the automatic storage configuration unless dual booting on the same drive.
- Optionally encrypt the drive with a password if desired.
- If you lose this password, then it cannot be decrypted.
- A PHYSICAL WIRED KEYBOARD IS REQUIRED TO UNLOCK THE DEVICE!
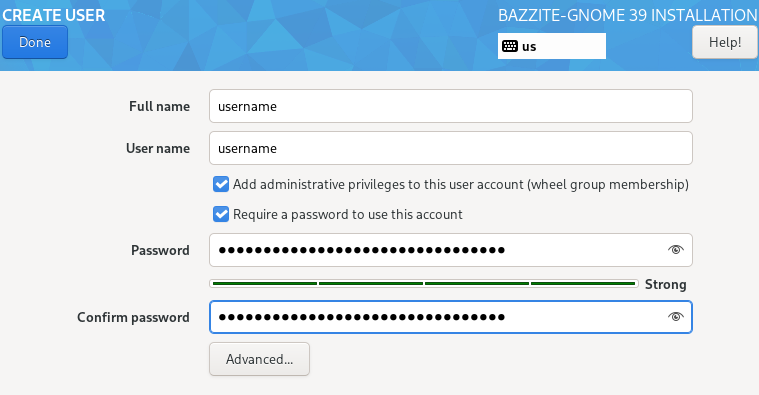
- Setup a user account.
- Give administrative privileges and set a user password.
- Begin the installation.
- Reboot device after it has finished installing.
Dual Booting
Note
Skip this section if you plan to install Bazzite without dual-booting Windows.
Dual-Booting Windows
For dual booting Windows on separate drives, use your motherboard's UEFI boot menu as the GRUB bootloader may not recognize each boot entry correctly.
Video Walkthrough
https://www.youtube.com/watch?v=KAt49B6rSFI
Written Walkthrough
- Installing Bazzite with a shared drive.
- Installing Bazzite on a separate drive.
- (In Windows) Disable Bitlocker encryption and fastboot, and reboot.
- (In Windows) Resize the Windows partition with the Disk Management app to have enough space for Bazzite.
Usually should look something like this:
 Source: diskpart.com
 - Run the Bazzite installer with the automatic partitioning option.
- Reboot into Bazzite and run
ujust regenerate-grubin the terminal to add Windows to the GRUB.
- (In Windows) Resize the Windows partition with the Disk Management app to have enough space for Bazzite.
Usually should look something like this:
Source: diskpart.com
- Run the Bazzite installer with manual partitioning
- Reboot into Bazzite and run
ujust regenerate-grubin the terminal to add Windows to the GRUB.
When a dedicated drive is feasible, this method is recommended.
Install Bazzite on a separate internal or external drive.
- Install the other operating system on a drive (like Windows).
- Install Bazzite on a second drive.
- Set Bazzite as the default in your boot order (optional).
If you install Windows second, you should disconnect the Bazzite drive to prevent using the Windows installer of using its EFI partition.
You can also install Windows to an external drive with Windows-to-Go using Rufus to dual boot if you do not have an internal drive available.
If you install Windows after Bazzite, you can restore Bazzite's bootloader with the Bootloader Restoring Tool in the Live ISO.
Manual Partitioning Instructions
Only users who are dual booting on the same drive should use these instructions. Automatic partitioning is preferred in other cases.
Bazzite only supports the BTRFS filesystem for /.
If you need a tutorial video for manual partitioning, watch this tutorial at timestamp 9:10.
- Select Installation Destination
- Select
Advanced Custom(Blivet-GUI)under Storage Configuration.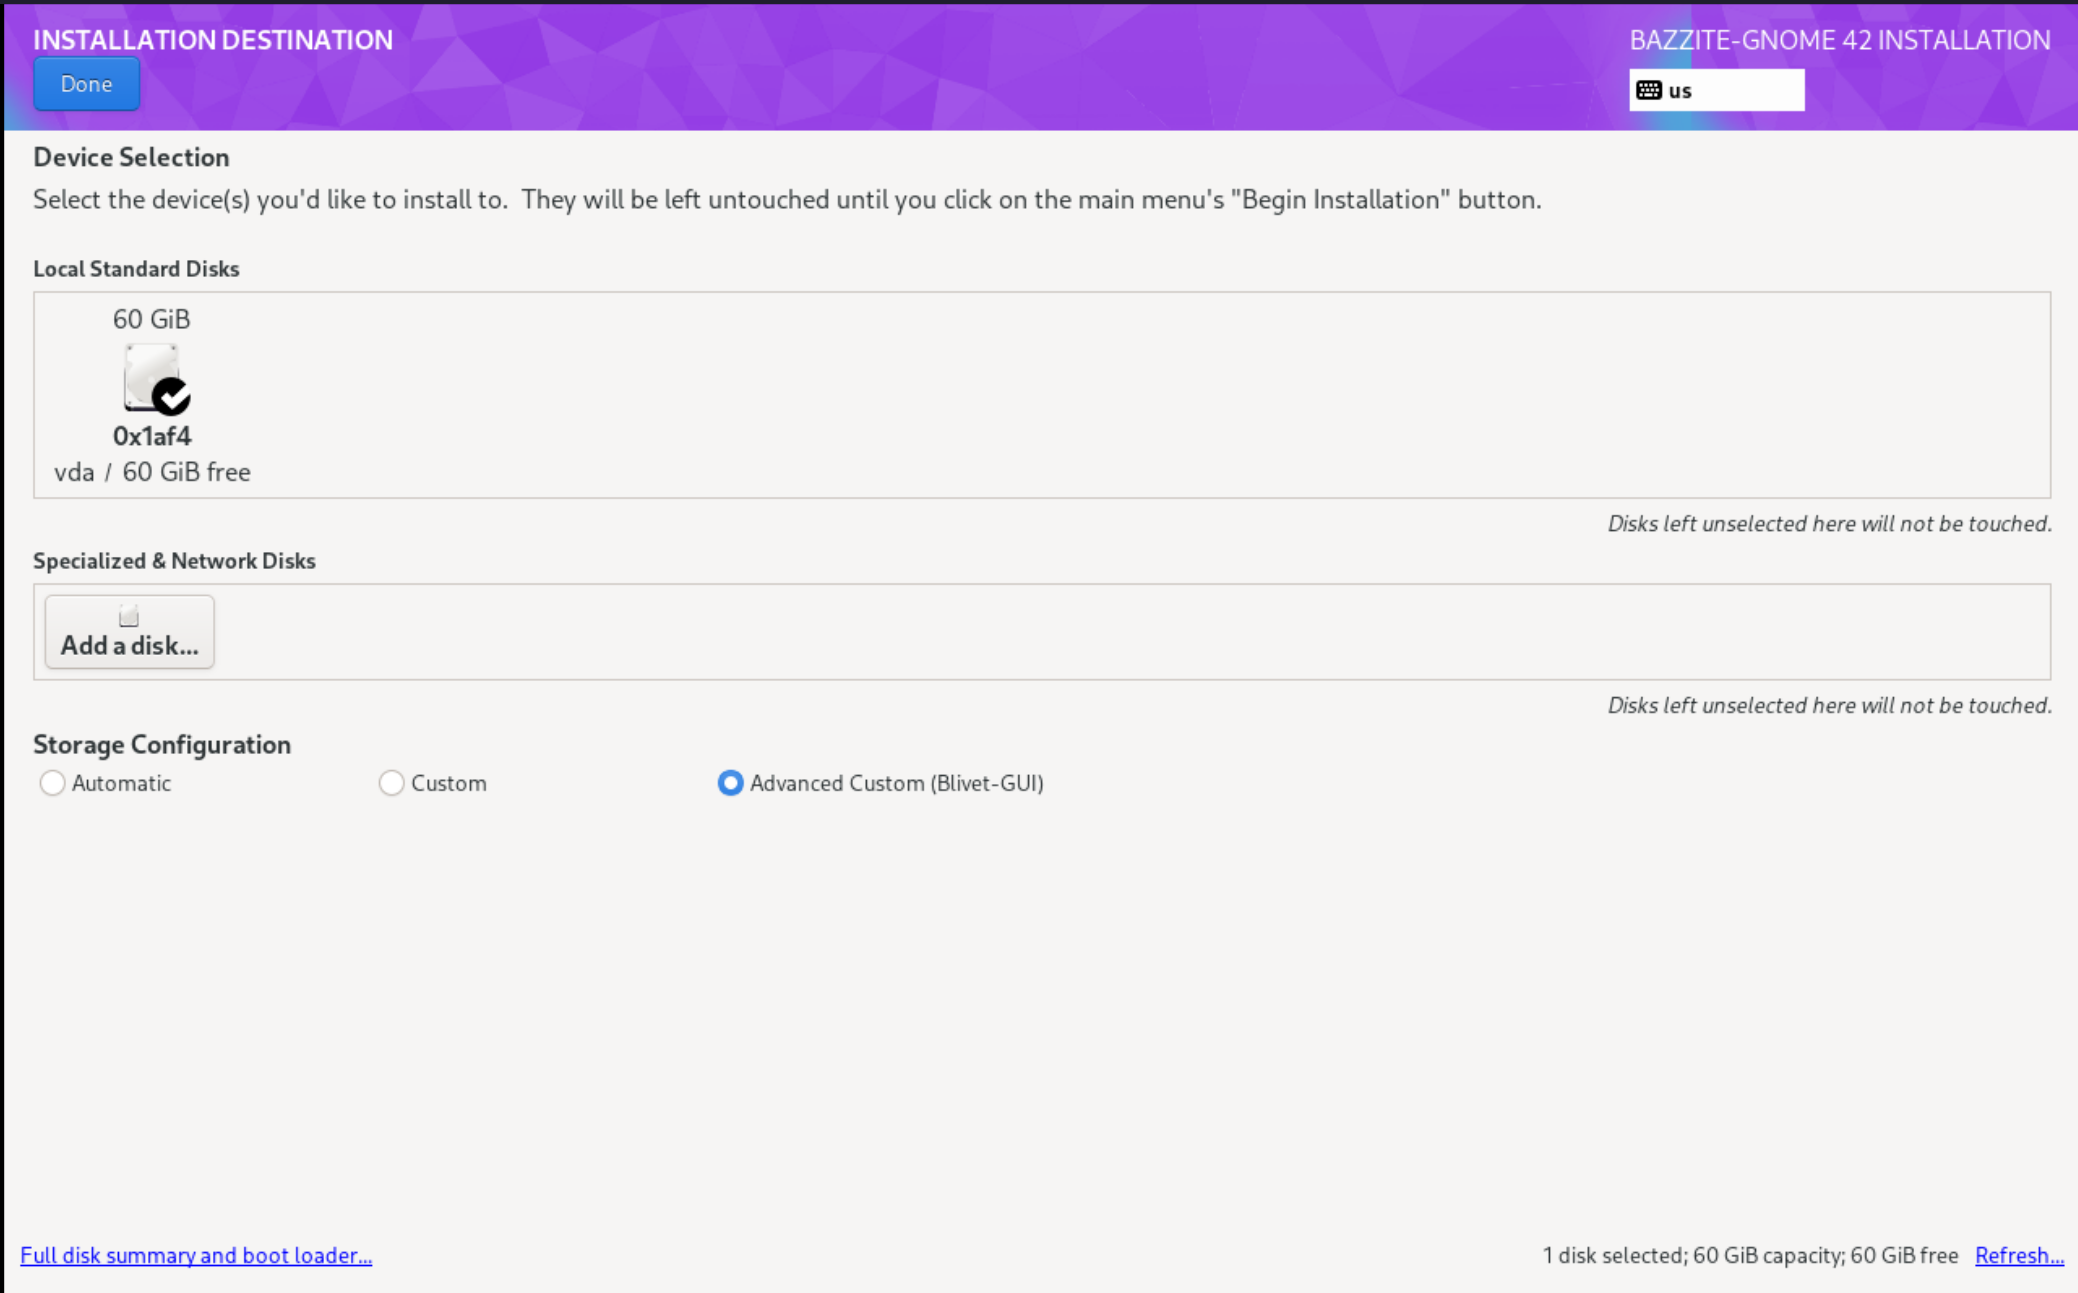
- Create the following partitions and devices:
- /boot/efi

- /boot
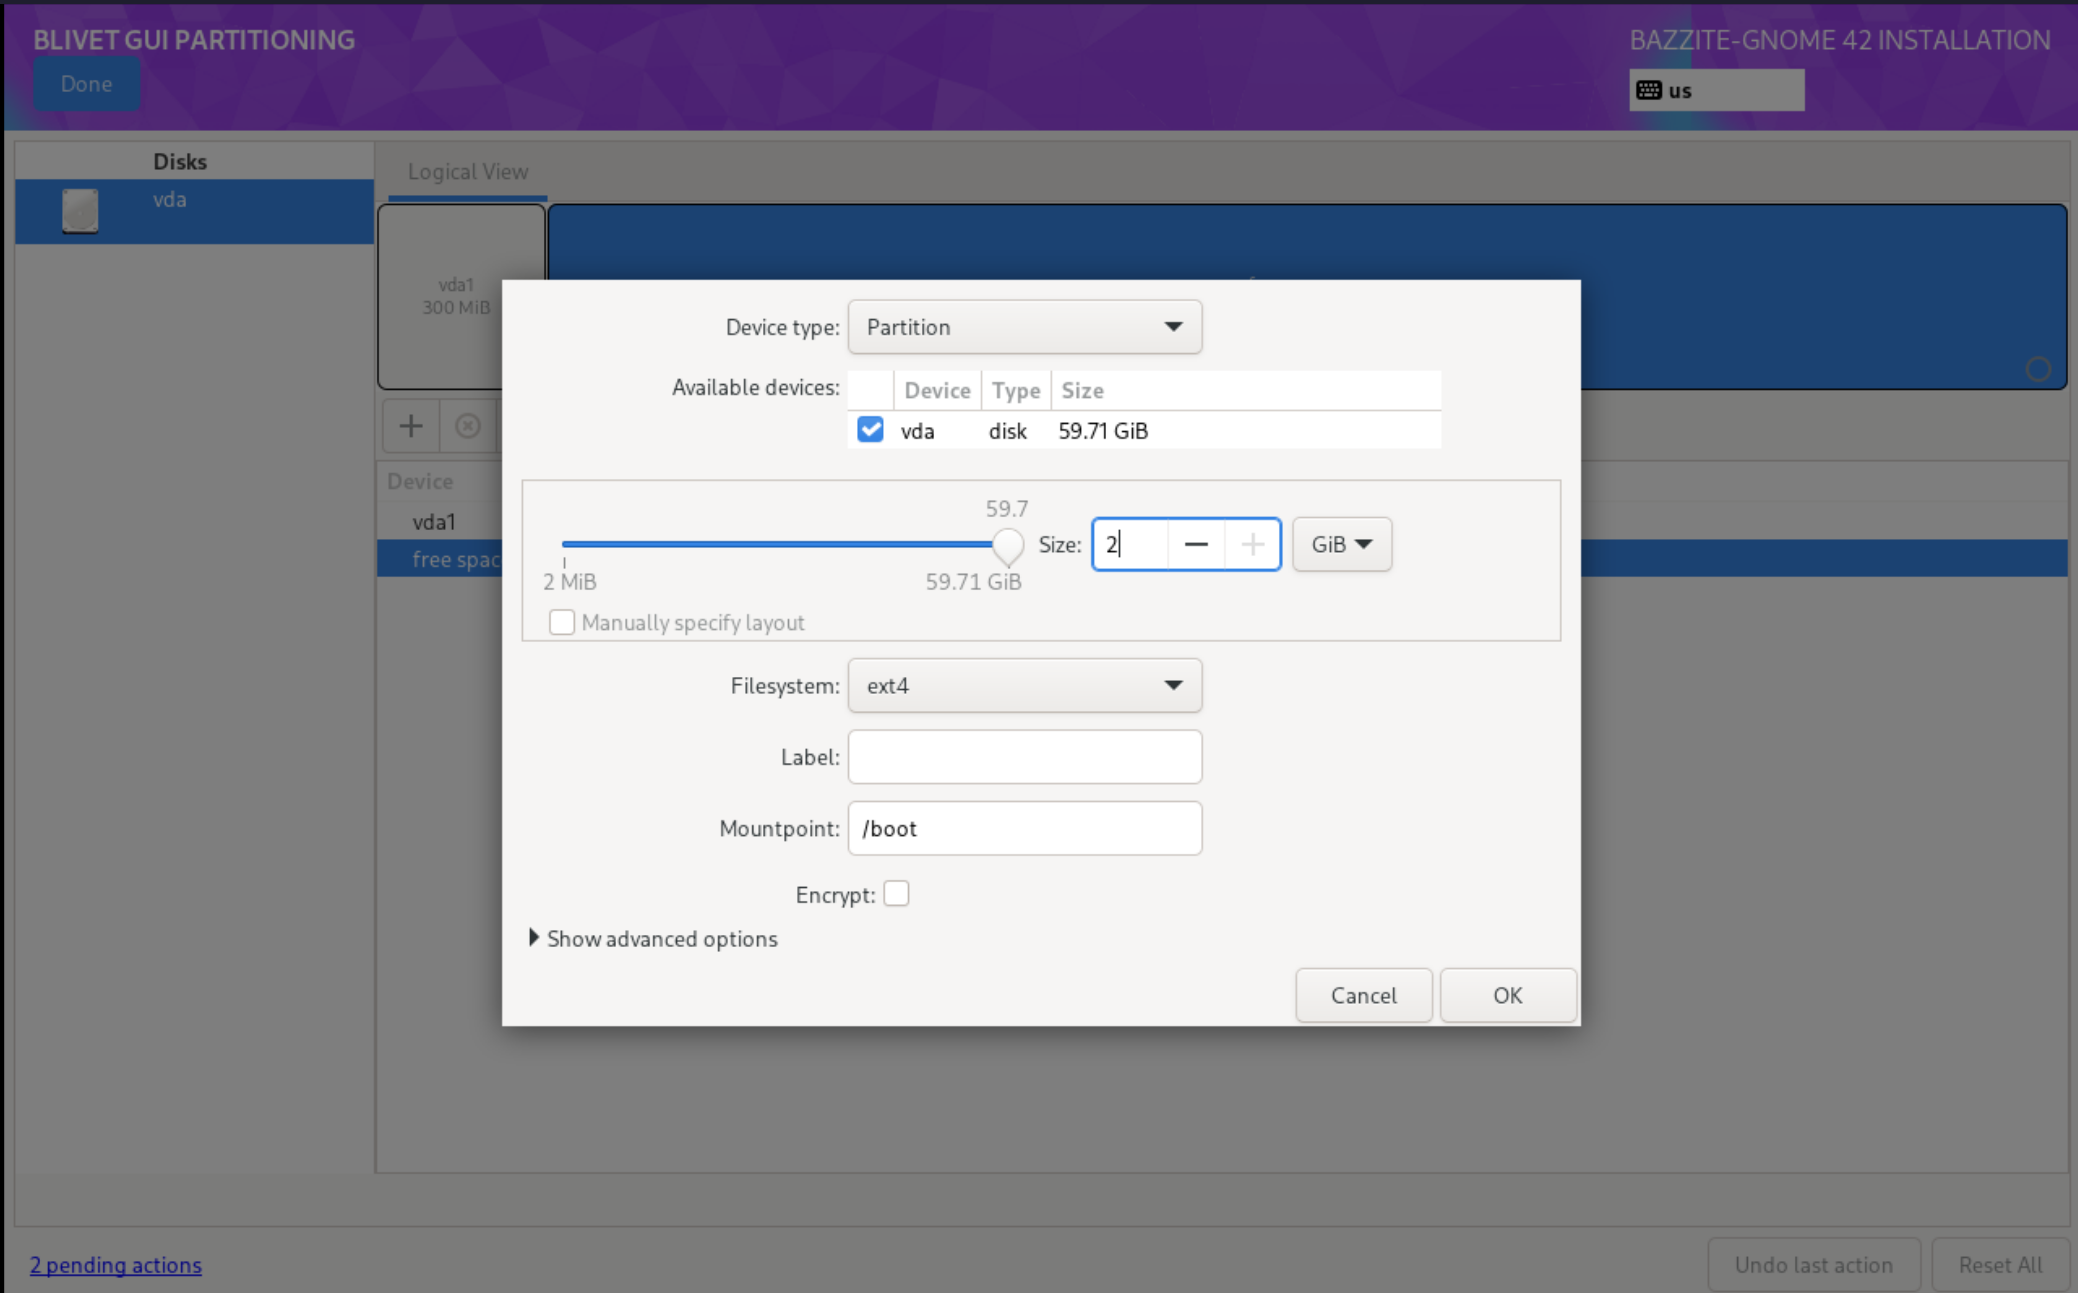
- btrfs partition
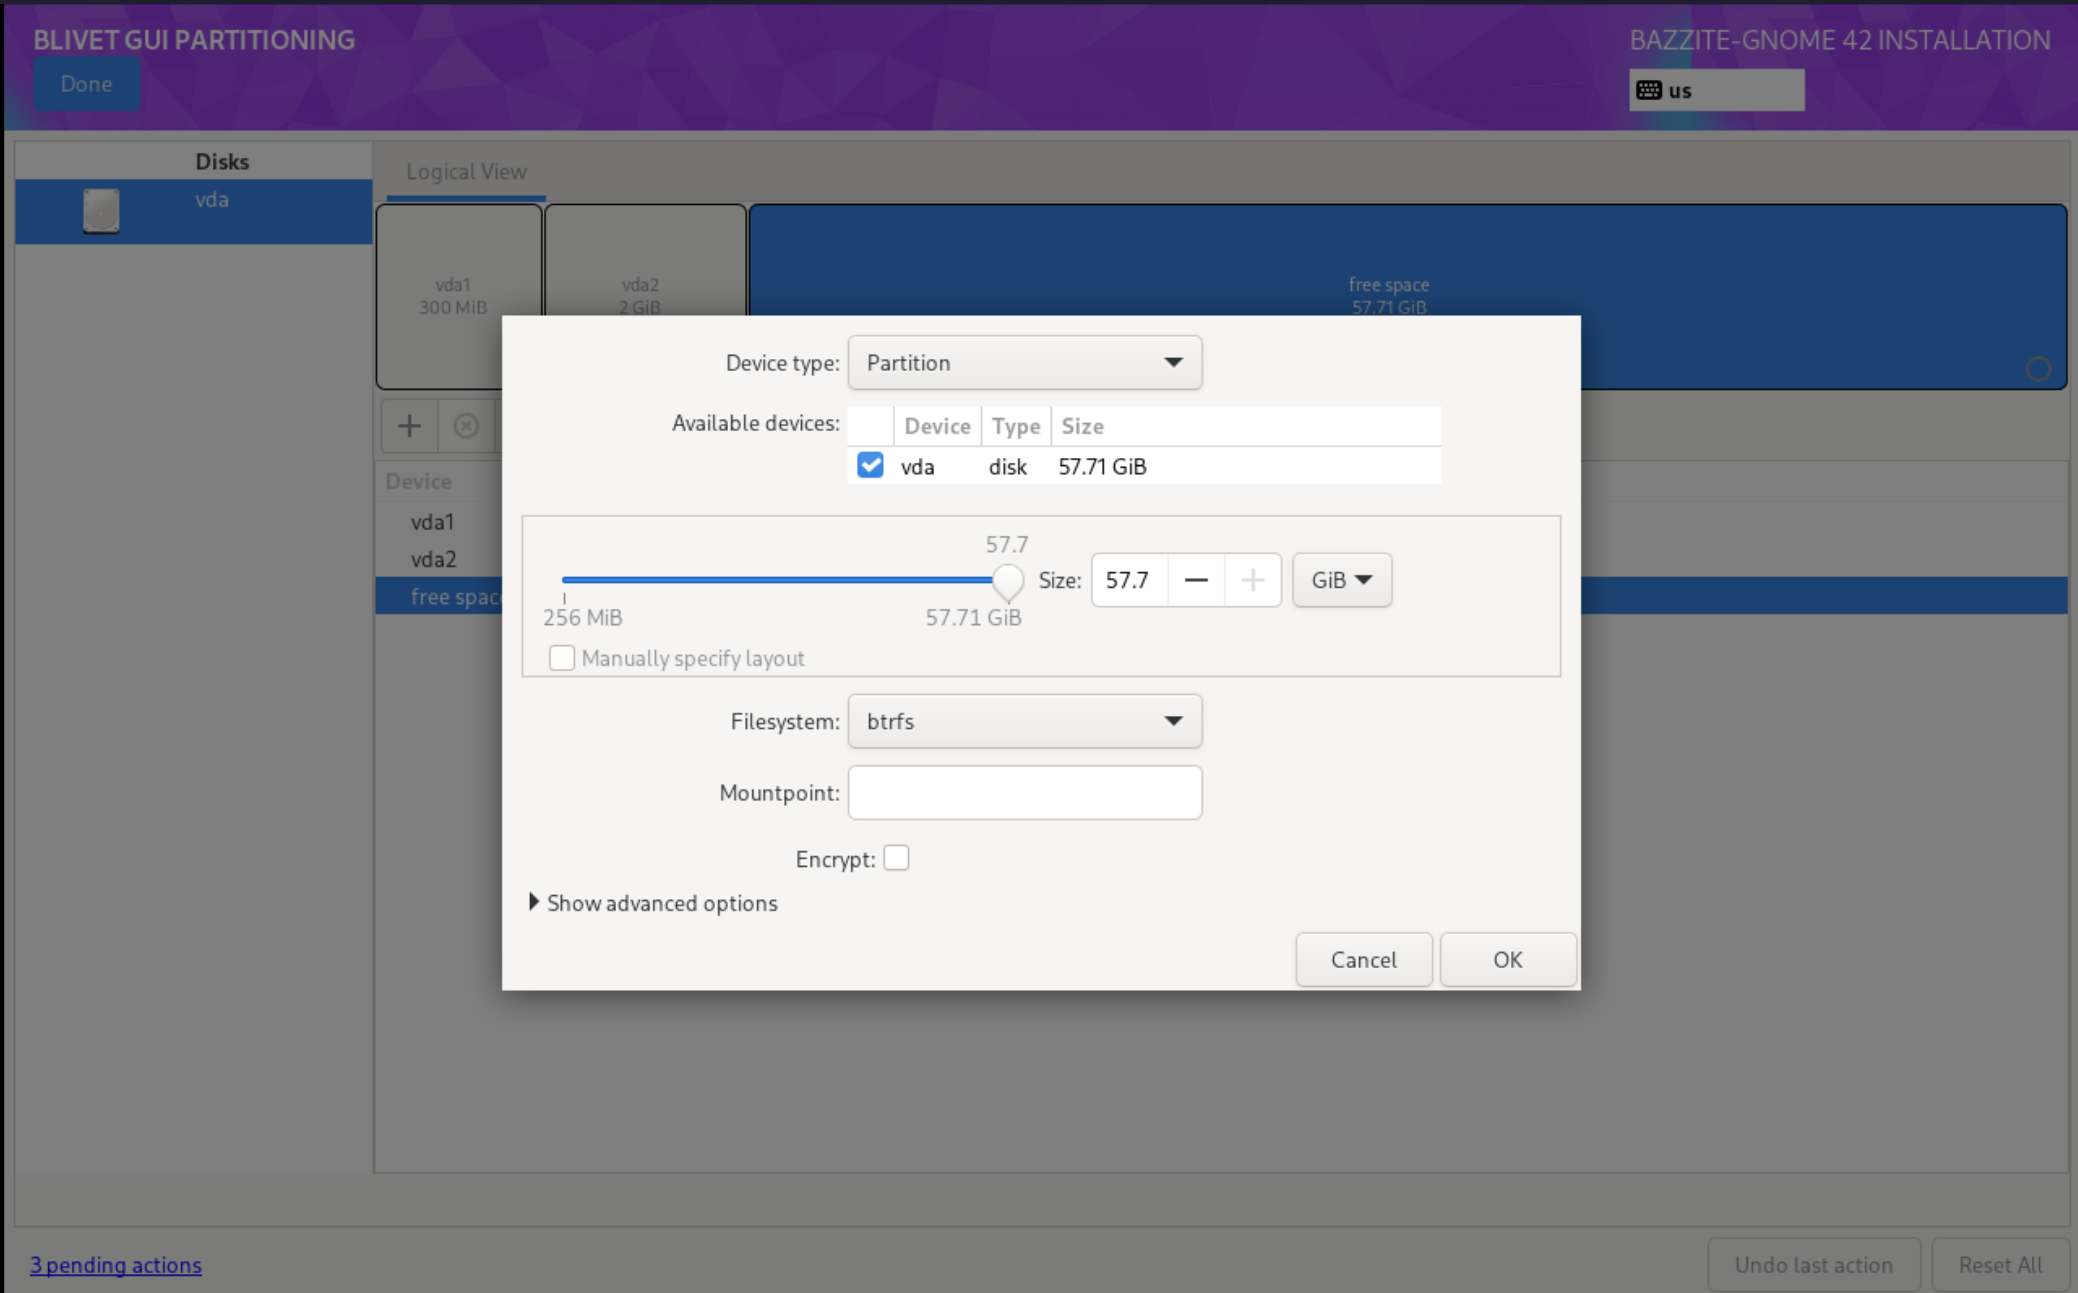
- /
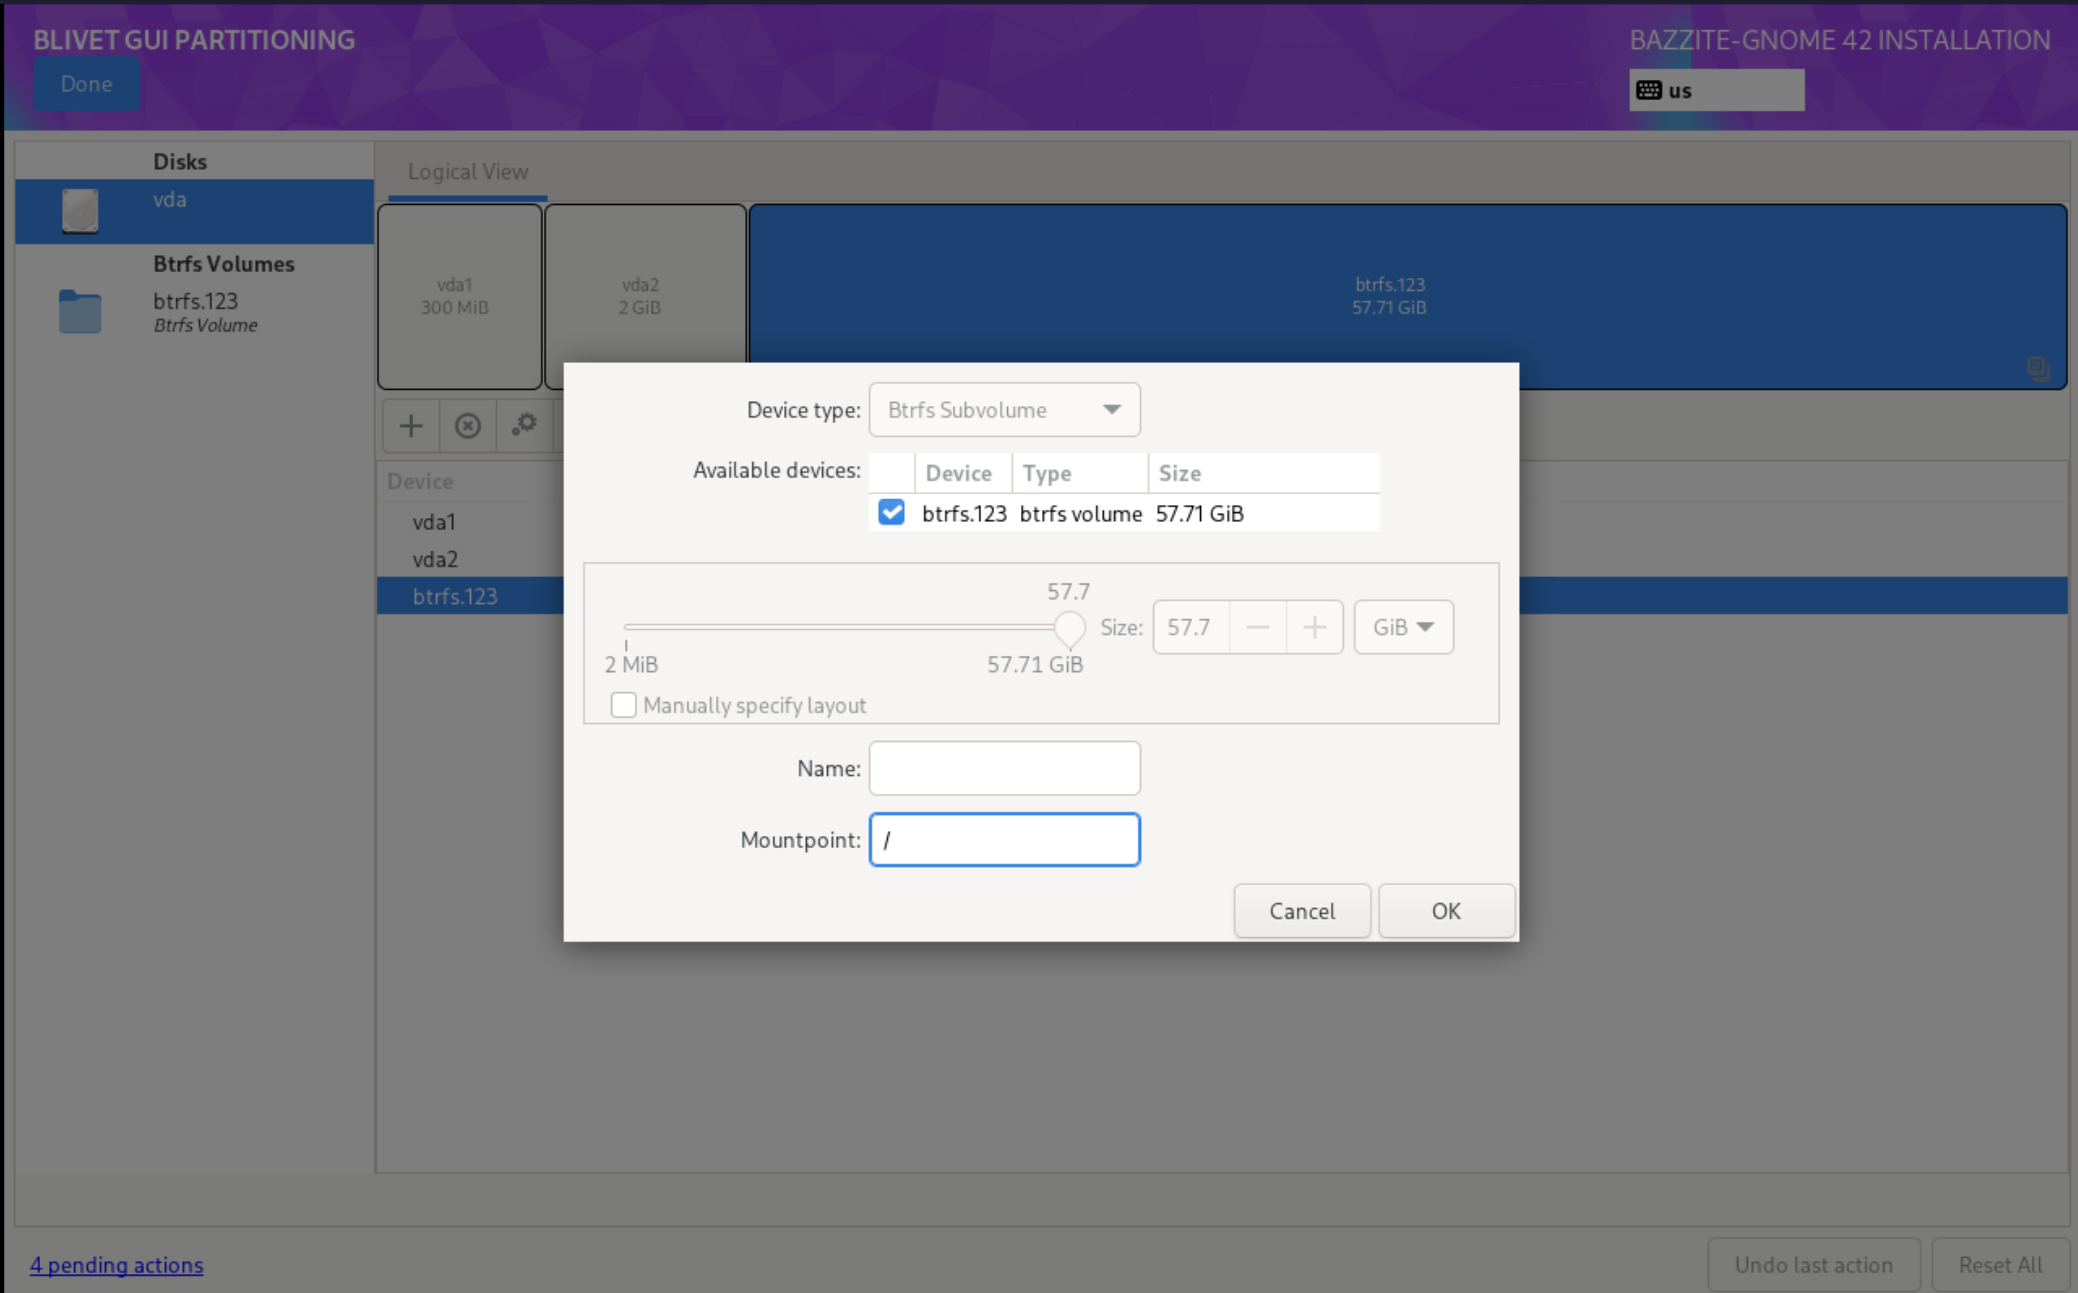
- /var

- /var/home
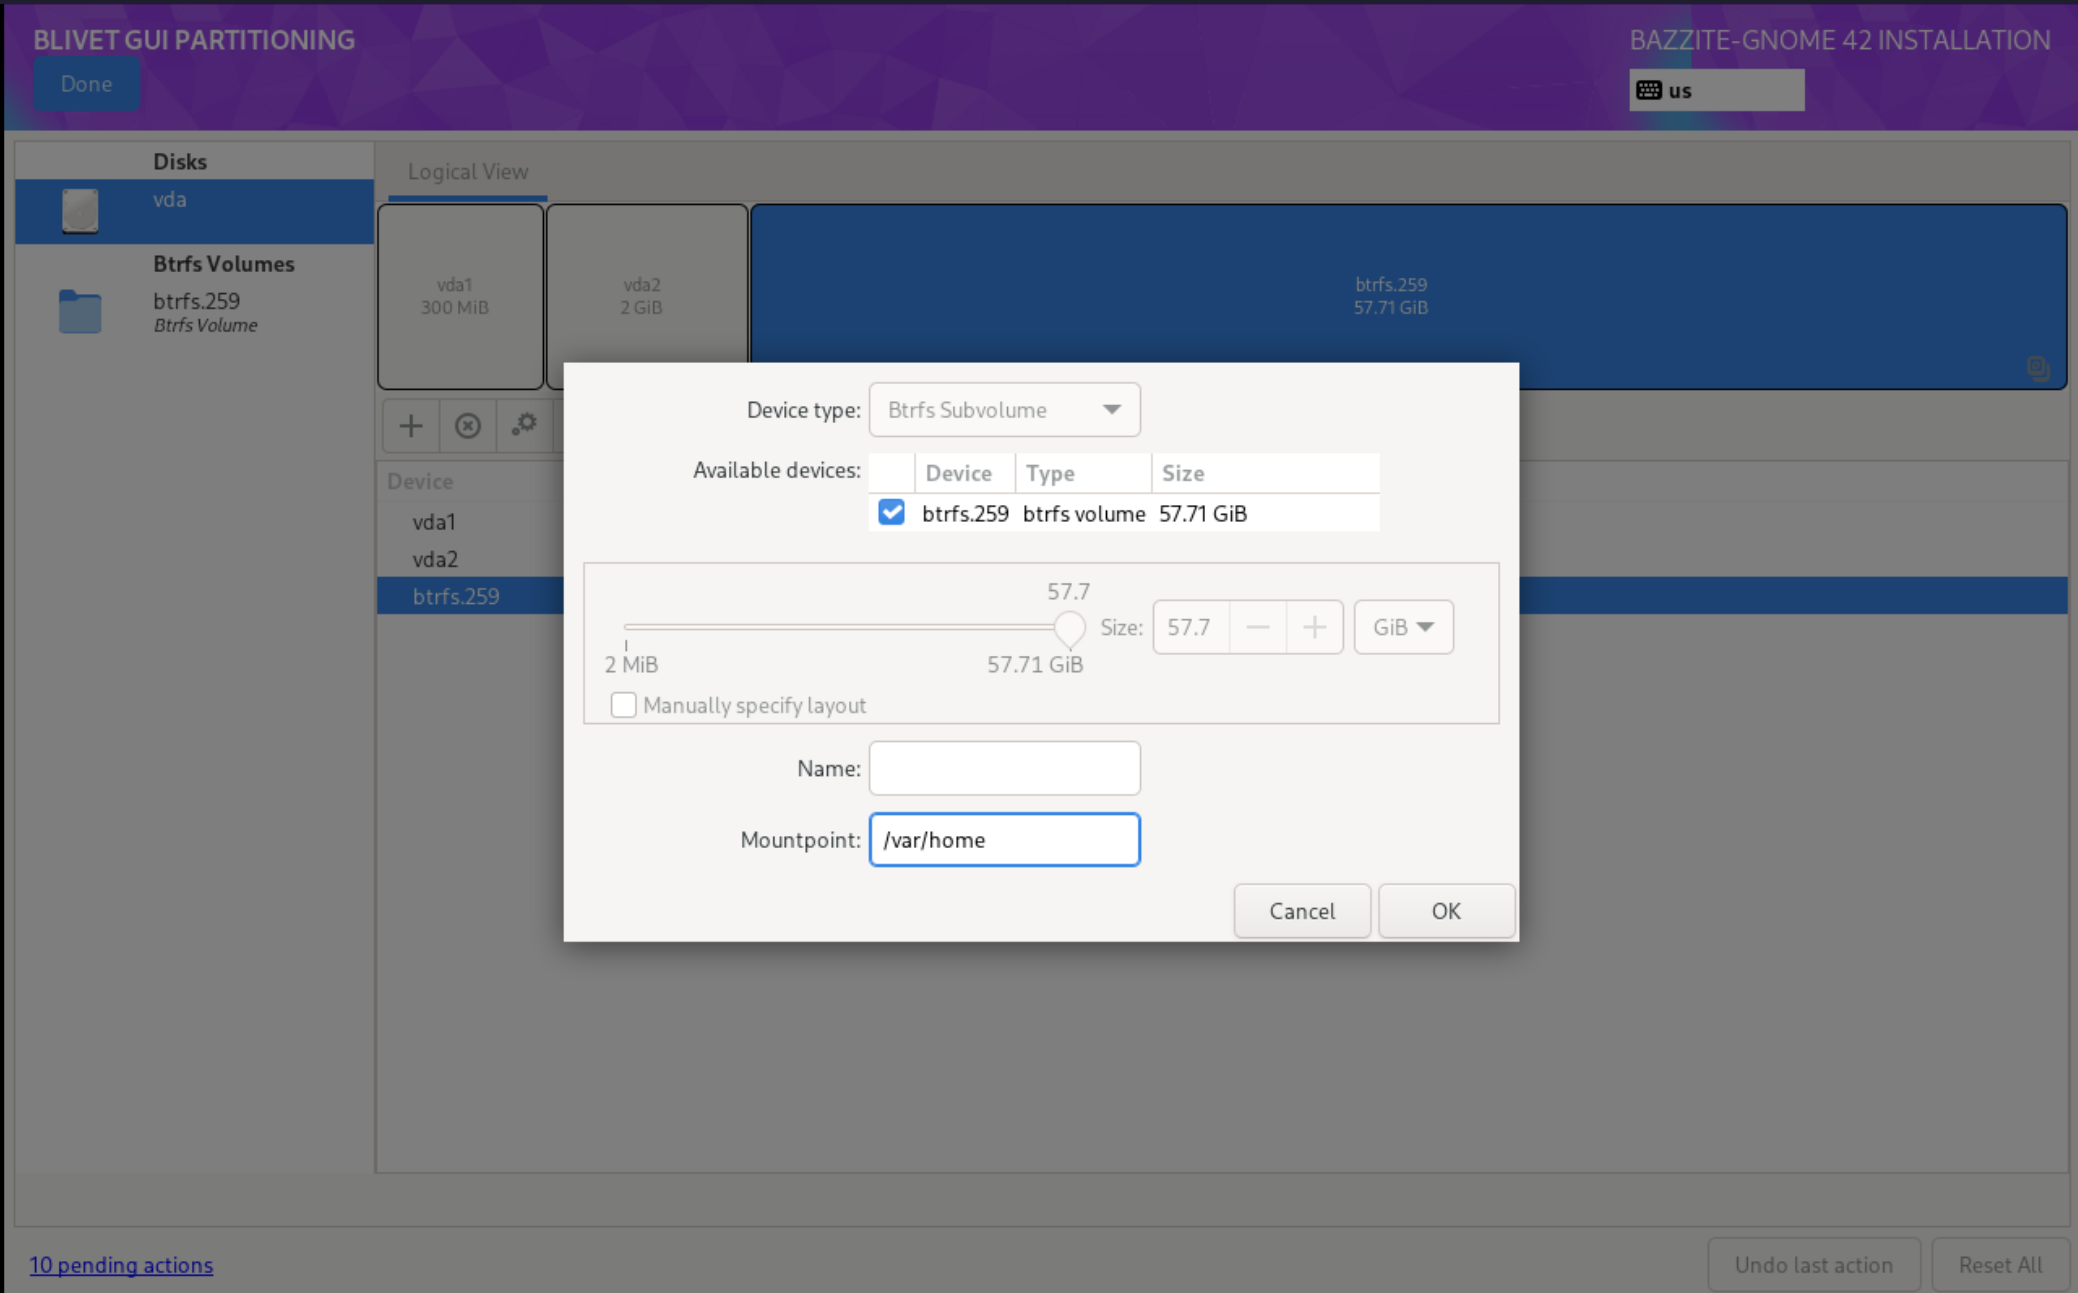
- Select Done
- Select Accept Changes
- Continue with the installation.
Dual booting other Linux operating systems
Note
Dual booting with other Linux distributions, especially non-atomic Fedora, is not officially supported. It is recommended to use your motherboard's UEFI boot menu or to forgo dual booting entirely to avoid unexpected issues. If something does go wrong, restore Bazzite's bootloader using the Bootloader Restoring Tool in the Live ISO.
For Fedora Atomic Desktop images on the same drive: to dual boot another Fedora Atomic Desktop image (like Bluefin) installed alongside Bazzite, you must make an additional EFI partition and switch between them through your motherboard's UEFI boot menu.
For dual booting on separate drives:
Use your motherboard's UEFI boot menu as the GRUB bootloader may not recognize each boot entry correctly.
Secure Boot
Note
Skip this section if Secure Boot is not enabled or unsupported with your hardware.
Important
The enrollment prompt uses an English QWERTY keyboard layout, indiscriminately of your actual hardware keyboard. Other layouts can therefore interfere with the characters of the password (i.e. A and Q are swapped on AZERTY layouts).
Bazzite supports Secure Boot however Universal Blue's key must be enrolled to use it otherwise keeping Secure Boot on in your BIOS will result in Bazzite not booting.
Important Secure Boot Notes:
- Entering the password will register invisible characters for security purposes, so you will not be able to see what you are typing!
- Updating your BIOS may re-enable Secure Boot and you may have to follow "Method B" after updating it to resolve the black screen on boot complaining about loading the kernel first.
- The Steam Deck does not come with secure boot enabled and does not ship with any keys enrolled by default, do not enable Secure Boot on your Steam Deck unless you absolutely know what you're doing.
Error Message (if key is not enrolled properly):
error: ../../grub-core/kern/efi/sb.c:182:bad shim signature.
error: ../../grub-core/loader/1389/efi/linux.c:256:you need to load the kernel first.

Press any key to continue...
Follow Method B below to resolve this and move past the error message if you encounter it.
Method A - During Installation Method

Note
This screen will also appear on the next boot if you enable Secure Boot if it was disabled during installation.
A blue screen will appear giving the option to enroll the signed keys after leaving the Bazzite installer.
Enroll MOK if you have secure boot enabled. If prompted to enter a password, then enter:
Otherwise Continue boot if you have Secure Boot disabled or if it is not supported with your hardware.
Method B - After Installation Method
Disable Secure Boot in the BIOS before proceeding, and then re-enable it after enrolling the key.
If you have already installed Bazzite then enter this command in a host terminal:
If prompted to enroll the required key, then enter the password in the host terminal:
You can now turn Secure Boot back on in the BIOS. Use the following command to boot straight into your system's BIOS (if supported):
Complete MOK enrollment at boot
On the next boot, you will see the blue MokManager screen:
- Choose Enroll MOK.
- When prompted for a password, enter:
After the reboot, the key is enrolled and Secure Boot can remain enabled. Your system should now boot normally under Secure Boot.
Troubleshooting Installation:
Read the Troubleshooting Guide or the Alternative Installation Guide for installation workarounds.
Post-Installation
Bazzite is now installed. Read the Post-Installation Guide for recommended next steps or start gaming!