ScopeBuddy
What is it?
- A small script that works as a gamescope bridge to avoid having to copy paste long launch options for many games.
- Allows you to set Environment Variables (env vars) and gamescope launch options globally, per game or depending on what mode ScopeBuddy or Steam is running in.
- Gives you the ability to automate running bash scripts before the game runs (this is a side effect of how the config files work)
- You can bring your configurations with you between computers by just copying
~/.config/scopebuddyto a new device - It also is used as a workaround to fix the Steam Overlay when using nested gamescope in desktop mode.
- Fixes SteamInput when used in nested mode on Desktop.
How to use it
As a gamescope replacement just to fix the Steam Overlay:
If you just want to fix the Steam Overlay (and Steam Input in some games), all you have to do is replace gamescope in your launch options for the game with scb or ScopeBuddy.
Essentially turning
Into
Now your Steam Overlay will work when using gamescope for a game in desktop mode! 🎉
Usage in Lutris
- Open Lutris and right click on the game you want to use ScopeBuddy with.
- Click
Configure - Go to the
System Optionstab and scroll down toGame execution - Click
AddunderEnvironment variablesand set the key toSCB_APPIDand the value tolutris/nameofgame. - In the
Command prefixaddscb -- - Click Save
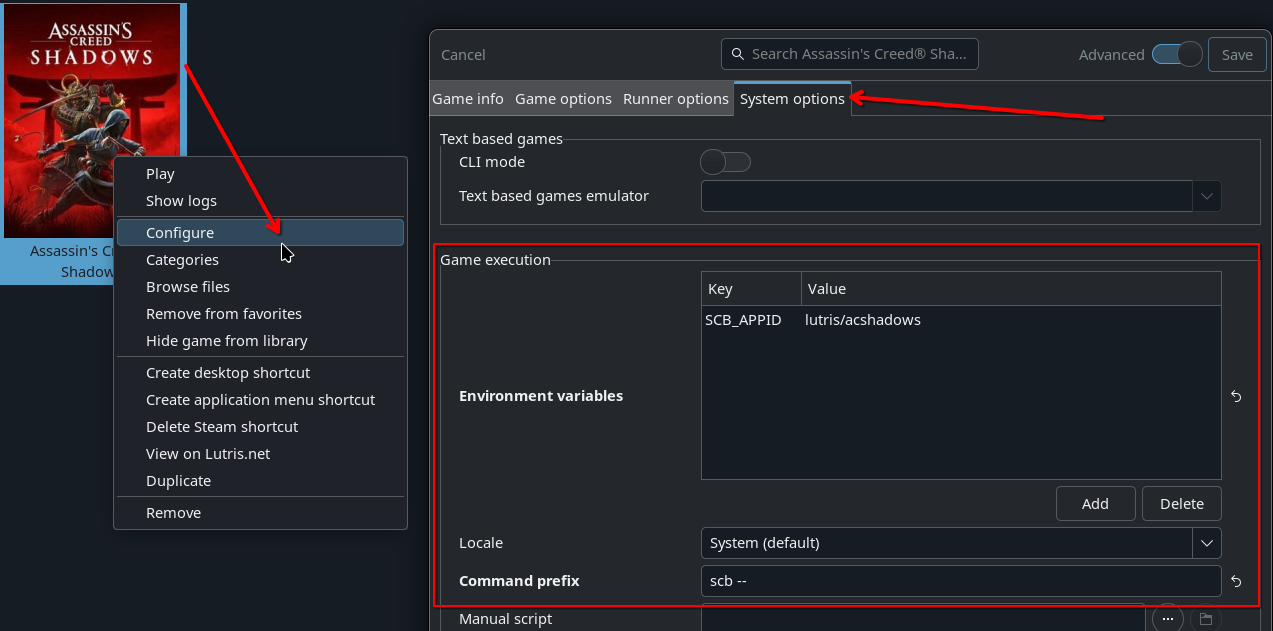
The SCB_APPID Environment variable is optional, but will let you take advantage of game specific config files
Configuration files
Setting global defaults
If you ran your game once with the above launch options, ScopeBuddy will have created a default example config for you ~/.config/scopebuddy/scb.conf
It might be possible that the file doesnt exists, in such case, create an empty one.
Inside the file you can add env vars and setup a default set of gamescope arguments.
The above scb.conf will make ScopeBuddy always set the keyboard layout in gamescope to norwegian and run gamescope with the arguments -f -w 1920 -h 1080 -W 2560 -H 1440 -r 180
This means we can now shorten our Launch Options for games we want to run in gamescope to just
Note
--launcher-skip is just an example launch option
Auto Resolution/HDR/VRR
For users that routinely change resolutions or use game streaming via Sunshine/Moonlight or Steam Remote Play, your display properties may change frequently.
On KDE desktops (early Gnome support added with caveats), ScopeBuddy accepts configuration to automatically inject the width and height, HDR state, or VRR state of your primary display.
Add the following variables to the following to the config file at ~/config/scopebuddy/scb.conf:
SCB_AUTO_RES=1 # Overrides output height and width with current display
SCB_AUTO_HDR=1 # Adds --enable-hdr if the current display has HDR enabled
SCB_AUTO_VRR=1 # Adds --adaptive-sync if the current display has VRR enabled
Hard-coding a specific display in your SCB_GAMESCOPE_ARGS with --prefer-output {your-device-here} will make these automatic values detect from the preferred display.
A full config example using SCB_AUTO_* vars might look like:
SCB_GAMESCOPE_ARGS="-f --mangoapp" # passes args for fullscreen + mangohud to gamescope
SCB_AUTO_RES=1
SCB_AUTO_HDR=1
SCB_AUTO_VRR=1
This will result in the following gamescope command output when your KDE display is set to 2560x1440 with HDR and VRR on: gamescope -f --mangoapp -W 2560 -H 1440 --hdr-enabled --adaptive-sync.
Later, if you switch your KDE display to 1920x1080 with HDR off and VRR on: gamescope -f --mangoapp -W 1920 -H 1080 --adaptive-sync.
All without changing a single line in your Steam launch options or ScopeBuddy config!
Additional Config Files
If you have a different set of defaults you use for a game, for example you want to upscale this game from 1080p to 1440p, then you can have a separate default config and tell ScopeBuddy to use that instead.
For this example, make the file 1080p.conf inside ~/.config/scopebuddy/ and add defaults specific to what you want to use for upscaling from 1080p.
To use this new config you can tell ScopeBuddy to use it by setting the SCB_CONF env var in the games Launch Option in steam
ScopeBuddy will now use 1080p.conf instead of scb.conf to set default options and environment variables.
Note
If you supply any argument to ScopeBuddy then SCB_GAMESCOPE_ARGS will be ignored entirely!
This means using the launch option scb -f -- %command% will load the env vars from scb.conf however it will not use SCB_GAMESCOPE_ARGS from any config files.
Setting specific options for a single Steam game
For this example we will use Path of Exile 2, this game supports HDR, so we want to append the --hdr-enabled argument to gamescope.
First we will need to find Path of Exile 2's Steam AppID, you can find this by going to the games Properties in Steam and then heading to the Updates section.
At the bottom you will see some information, you want the App ID value, in our Path of Exile 2 example this is 2694490.
Now make 2694490.conf inside ~/.config/scopebuddy/AppID/ and add your Path of Exile 2 specific options.
And for examples sake let's set SteamDeck to 0, because let us say the game enforces settings that are only relevant on Steam Deck hardware, so we turn off announcing to the game that we are on the Steam Deck Client.
Now when steam runs scb -- %command%, ScopeBuddy will load the config from scb.conf then load AppID/2694490.conf afterwards to apply extra options on top of the defaults (or replace previous options from the default config if the same variables are exported or changed again)
Notice how SCB_GAMESCOPE_ARGS uses += instead of =.
+=means append this at the end of the current variable.=means to replace everything in the variable.
This let's us re-use the SCB_GAMESCOPE_ARGS we set in our scb.conf
Note
You can also set an AppID manually using SCB_APPID="somecoolgame" to override the automatic AppID detection which only supports Steam currently. This can be used to manually add rudimentary support for "AppID"-like configs for games in other launchers like Lutris or Heroic; for example, SCB_APPID="heroic/somecoolgame" would use the config file AppID/heroic/somecoolgame.conf.
Frequently asked questions (FAQ)
Is there a graphical application for making configurations?
Yes! There is one on flathub: ScopeBuddy GUI
Can I use ScopeBuddys functions without using gamescope?
Yes, just use the env var SCB_NOSCOPE=1 in the Launch Options like this
This will tell ScopeBuddy to not launch gamescope and ignore SCB_GAMESCOPE_ARGS in all configs.
The default config file will also be set to noscope.conf instead of scb.conf unless you also added the SCB_CONF env var to the launch options.
Note
You can also export SCB_NOSCOPE=1 inside an appid config if you never want to use gamescope for a game but still use ScopeBuddy for it. However noscope.conf will be ignored when used like this, due to it being applied after scb.conf has been loaded.
Does ScopeBuddy work inside Steam Gaming Mode?
Yes!
When ScopeBuddy detects that steam is running in Steam Gaming Mode, it will force SCB_NOSCOPE=1 and SCB_CONF=gamemode.conf so that you can set custom options that will only be used in Steam Gaming Mode while keeping game specific options!
This means you can use ScopeBuddy to automatically handle using nested gamescope when in desktop mode and not utilizing gamescope when inside Steam Gaming Mode. No more manually adding and removing gamescope from launch options when you switch between Steam Gaming Mode and Desktop Mode! 🎉
Can I have ScopeBuddy handle the launch options for my games?
Of course! You will just use an AppID config for this and you can then append launch options by adding this to the AppID config for the game.
Note
The += is very important as you NEED to append launch options to the %command%, it is also vital that you start with a space after the first " otherwise the game will fail to launch.
Can I have ScopeBuddy not apply its fixes and only use it as a gamescope manager?
Using the following environment variables will change ScopeBuddy's default behavior
SCB_APPENDMODE=1setting this inscb.confwill let you supply arguments to ScopeBuddy and they will be appended after the gamescope arguments in any config files.SCB_STEAMARGIGNORE=0setting this inscb.confwill make ScopeBuddy no longer strip the-eor--steamarguments if it is supplied to gamescope, this is due to this specific flag currently crashing gamescope.SCB_NESTEDFIX=0setting this inscb.confwill disable the Steam Overlay and SteamInput fix that ScopeBuddy applies (before you ask, they are the same fix)
Note
See XKCD 1172 for context to why these environment variables exist
When should I use export for an environment variable?
This depends if it is an internal variable for ScopeBuddy or a global variable for games. Rule of thumb is that you export every environment variable except in the situation of
- It starts with
SCB_as these are all internal ScopeBuddy variables - The variable is named
commandas this is the internal ScopeBuddy variable containing everything inside%command%from steam (or everything after the--)
Wait... This is all just Bash!?
Every config file for ScopeBuddy is a full bash script that is sourced before running gamescope and the game. This means if you are an advanced user you can do some really creative stuff! You can also set SCB_DEBUG=1 to have the final command written to ~/.config/scopebuddy/scopebuddy.log
Note
Steam will mess with the launch environment, some tools like curl will have incompatible libraries in the environment while wget will work fine. Test your scripts properly and have them write to a log for easy debugging using 2>&1 1>/tmp/myscript.log at the end of it in the config to write the output to a log file during testing.
Some handy variables available to you are
$SCB_NOSCOPEwill be set to 1 if ScopeBuddy was launched withSCB_NOSCOPE=1$SCB_GAMEMODEwill be set to 1 if ScopeBuddy is ran from within steam Steam Gaming Mode (this also impliesSCB_NOSCOPE=1)$SCB_CONFIGDIRwill be$HOME/.config/scopebuddythis means you can source other configs within your config (please do not make an infinite loop!)$commandwill contain the expanded %command% variable from Steam and any launch options you added after it.
Let your creativity go wild! But please be responsible!
Script example for an ArcDPS updater for Guild Wars 2
This is meant as inspiration for any ideas you might have?
Make a config file for Guild Wars 2 AppID/1284210.conf
# Guild Wars 2
# Do not use gamescope for this title
SCB_NOSCOPE=1
# Use ArenaNet login instead of Steam
command+=" -provider Portal"

# Get the game directory from the expanded %command% variable from steam
GAMEDIR=$(echo $command | awk -F '" "' '{ print $12 }' | sed 's/\/Gw2-64.exe//')
# Run the arcdps updater script before game starts
"$SCB_CONFIGDIR/scripts/dl-arcdps" "$GAMEDIR"
Then make the script file (remember to make it executable) scripts/dl-arcdps
#!/bin/bash
# Get the directory passed to the script
GW2_DIR=$1
# Get the latest md5sum for arcdps
NEWMD5SUM=$(wget -qO- https://www.deltaconnected.com/arcdps/x64/d3d11.dll.md5sum | awk '{print $1}')
# Get installed arcdps md5sum
MD5SUM=$(md5sum "$GW2_DIR/d3d11.dll" 2>/dev/null | awk '{print $1}')
# If they do not match, ask to update arcdps
if [ "$MD5SUM" != "$NEWMD5SUM" ]; then
    if zenity --question --text="Update ArcDPS?\nNew MD5: $NEWMD5SUM\nOld MD5: $MD5SUM"; then
        # Use wget to download arcdps as curl does not work in the steam environment
        wget -O "$GW2_DIR/d3d11.dll" https://www.deltaconnected.com/arcdps/x64/d3d11.dll
    fi
fi
Video Overview
https://www.youtube.com/watch?v=p-uggidEjIM